5 Step Deadlift Set Up to Improve Your Technique

Want to improve your deadlift technique? Check out our step-by-step guide from Personal Trainers Harley Booth and Megan Knight on how to set up for the conventional deadlift with an Olympic Barbell. Whether you’re new to deadlifts or just looking to level up your form and lift heavier, these tips will help.
Why Should I Include Deadlifts in My Workouts?
One of the three big gym lifts, the deadlifts popularity rivals the squat in a battle to be the king of all exercises.
And there's no wonder they're so popular. Deadlifts are an amazing compound exercise that works your posterior chain, develops your core strength, and can increase muscle strength and size. It's a great total body exercise that you definitely want to have in your workout routine!
Probably the best part about the deadlift is that it's a functional exercise that replicates real life movements. Imagine picking an item off the floor and putting it back down again. While it may seem simple, the ability to lift a heavy load can help to avoid injury when lifting things in your day-to-day life -- helping to protect your back and improve your posture.
Not to mention, lifting in general is effective for muscle growth and empowering for the mind, benefitting both our physical and mental health. So, we think deadlifts are a win, win situation!
What Type of Deadlifts Are Best?
You may be familiar with various other types of deadlifts, from dumbbell deadlifts and Romanian deadlifts to kettlebell deadlifts and sandbag deadlifts -- we've shared several deadlift variations to try here. These all have a place in a gym routine, but using a barbell can allow for greater loading which makes it easier to really challenge yourself and get stronger!
What Equipment Do I Need to Set-Up for The Conventional Deadlift?
To set up for the conventional deadlift you'll need an Olympic Barbell loaded with some weight plates. The plates help to elevate the bar off up the floor, which helps with your set up position.
When picking what weight to use, remember to start light and master form before adding more. The plates can go up increments of 5kg so you can gradually increase as you start to get stronger.
While the deadlift may sound simple, it's super important to ensure the correct technique is adopted to target the correct muscle groups and avoid injury.
Top Tips for Executing the Conventional Deadlift
Step 1: Feet in line with the bar
Approach the barbell with your feet slightly wider than hip-width apart - as if you were standing ready to take a jump straight up into the air. Another handy cue to ensure that your feet are in the correct position is to look at where your shoelaces are tied and try to stand with them directly under the bar.
The most important thing is to make sure your feet are in a comfortable position so that they stay planted throughout the movement.
If the current set up doesn't feel quite right, it may be worth experimenting with a sumo stance to see which works best for you.
Step 2: Grip wider than hip width
Once you've found your preferred stance, bend your knees, and grip the bar just outside of hip width -- roughly on the outside of your shins.
We would advise using an overhand grip, which means that both of your palms are facing towards your body, to help avoid muscular imbalances.
However, you may wish to opt for a mixed grip so that one hand is pronated and the other supinated with one palm facing towards your body and the other facing away. This grip type may allow you to lift more weight and avoid grip fatigue, however it's important to swap the grip of each hand over to avoid imbalances and injury.
If you're new to barbell deadlifting, we recommend starting with an overhand grip and allow yourself to progress overtime to a mixed grip once you've become comfortable with the movement and mastered technique.
Step 3: Sit into the deadlift
Once you've found your grip and stance position, you'll need to 'pull the slack out of the bar'. This phrase refers to creating tension between your body, the floor, and the barbell to help maintain technique throughout the lift, minimise injury and prepare the body for lifting.
To do this, keep your feet planted and your grip on the barbell strong before bringing your hips down to sit back into the deadlift and pinning your shoulder blades back.
Step 4: Lift chest up and scapula down
The final preparation for the deadlift requires the chest to lift and the scapula to be retracted. This means you need to pull your shoulder blades back and down -- creating a stable position to avoid pulling your shoulders up towards your ears.
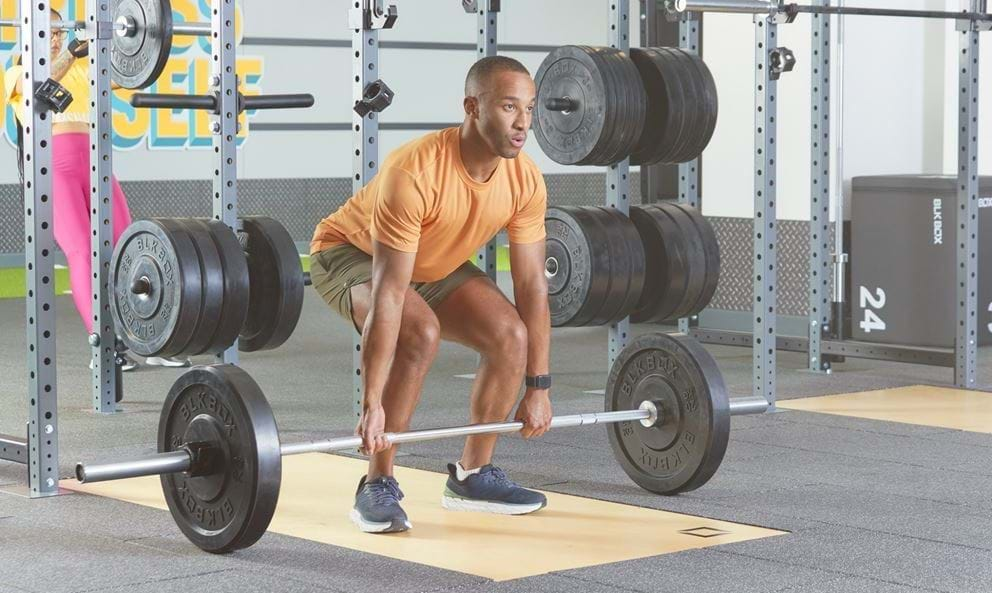
To do this, sit further into the deadlift ensuring your hips sit higher than your knees but lower than your shoulders. This positioning will prevent your deadlift from looking like a squat and therefore, will avoid targeting the wrong muscles.
To lift your chest up, pull your shoulder blades together as if you're trying to hold a pencil between them. You'll want to try and keep your shoulder blades in this position for the entirety of the lift. With your chest up and scapula down, your shins should now be vertical to the floor and your armpits sitting directly above the bar.
It's important to remember to keep your neck in a neutral position throughout the lift by refraining from looking straight ahead! It can be tempting to watch how you're performing in the mirror however, lifting your head will put the spine out of a neutral position which can increase injury risks.
If you want to check your form, we'd advise setting up a camera recording from a side view position so that you can monitor your set up, bar path and lift execution.
Step 5: Stand up and drive hips towards the bar
Your set up is now complete and you're ready to deadlift! Keeping the barbell as close to your legs as possible throughout the lift, take a deep breath in, allowing your stomach to push outwards and your core to become rigid. Think about bracing your core as if somebody were about to punch you in the stomach.
Drive through both feet, imagining pushing the ground away from you, similar to how you would when using the leg press machine. Be patient as the bar starts to lift off the ground to ensure your hips and knees extend at the same time.
Extending your knees before your hips can transfer much of the load to your lower back, placing unnecessary stress on it, so avoiding this is important!
As the bar rises, you'll need to push your hips forward, squeezing the glutes and hamstring as you reach full lock out of the hips. Ensure to extend until you're standing tall and no further! Excessively squeezing your glutes and leaning backwards will overextend the lower spine, putting it under a lot of pressure that could lead to injury.
To reverse the deadlift, maintain your neutral spine with the shoulder blades pinned back before pushing your hips back and hinging until the barbell passes your knees. From this position, bend the knees so that the barbell is back on the floor again. Think about performing a Romanian deadlift until just past the knees before flexing your knees to place the barbell back on the floor.
To commence the next rep, reset your positioning and revise steps 3 and 4 to ensure you're ready to lift again!
Once you've mastered the deadlift, you should quickly see an improvement in lower body strength. If growing your hamstrings is a goal, why not give this hamstrings and glute workout a try? Don't forget to stretch after -- we've shared our favourite hamstring stretches here.


